Kia Sportage: Spot welding
1. Commercial spot welding machines do not perform as well as the machines used in the manufacturing process. When spot welding, increase the number of spot welds by 30% (1.3 times the original number of welds).

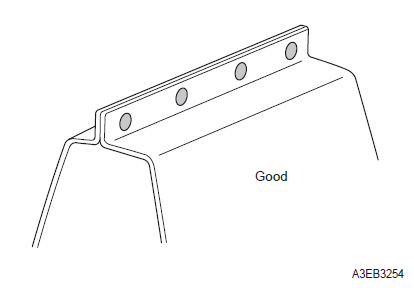
2. When spot welding, weld in the middle of the joint.
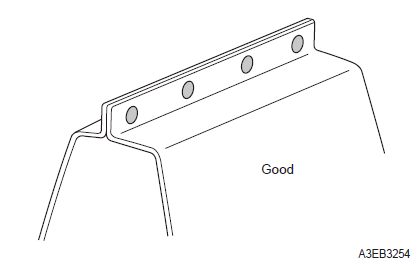
- Spot welding on the edge of the joint will reduce welding strength.

Carbon arc welding
In areas where spot welding is not suitable, do plug welding using a carbon arc welding machine.
1. Clamp the parts to be welded together tightly. Do not exceed 1 mm of space between parts. A tolerance greater than 1 mm will reduce the strength of the welded area.

2. Weld in the middle of the flange joint.
- Drill a hole 5~6 mm on one side of the flange only, and weld within the hole.
- Do not weld on the edge of the flange joint.

READ NEXT:
 Disassembly - Replacing body panel
Disassembly
1. Body measurement
Before disassembling, measure the damaged area
according to the dimensions supplied in Body
Dimension, Section 31. If deformation is present,
use a frame str
Preparation for assembly - Replacing body panel
Preparation for assembly
1. Spot weld finish
Use a disk grinder or similar tool to finish spot weld
mark. Do not grind more than is necessary to smooth
surface.
2. Panel preparation
Repair any
Assembly - Replacing body panel
Assembly
1. Checking welding and fitting in advance
When assembling a new part, measure the
dimensions of each part according to the body
dimensions given in Section 31, and set part to the
SEE MORE:
Hitches
If you are considering towing with your
vehicle, you should first check with your
country's Department of Motor Vehicles
to determine their legal requirements.
Since laws vary the requirements for
towing trailers, cars, or other types of
vehicles or apparatus may differ. Kia
recommends
Blade inspection
When the wipers no longer clean adequately,
the blades may be worn or
cracked, and require replacement.
To prevent damage to the wiper arms or
other components, do not attempt to
move the wipers manually.
The use of a non-specified wiper blade
could result in wiper malfunction and
failur
Content
- Home
- Kia Sportage - Fifth generation (NQ5) - (2022-2026) - Owner's Manual
- Kia Sportage - Second generation (JEKM) (2005-2015) - Body Workshop Manual
- Kia Sportage Third generation (SL) - (2011-2016) - Service and Repair Manual
- Sitemap
- Top articles
