Kia Sportage: Seat Heater
Components and Components Location
Component Location
[Driver Seat / Assist Seat]
![[Rear Seat]](images/books/1921/29/index%205.png)
[Rear Seat]

Repair procedures
Removal
1. Remove the seat back cover and cushion cover.
(Refer to the BD group - "Front seat")
2. Remove the driver / assist seat back heater (A) and cushion heater (B).

3. Remove the cushion cover of rear seat.
(Refer to the BD group - "Rear seat")
4. Remove the heater (A) of rear seat (LH) and the heater (B) of rear seat (RH).

Installation
1. Install the driver / assist seat back and cushion heater.
(Refer to the BD group - "Front seat")
2. Install the heater of rear seat (LH & RH).
(Refer to the BD group - "Rear seat")
Inspection
Driver / Assist Seat
1. Check for continuity and measure the resistance between terminals as below.
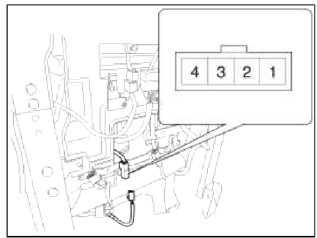
- Indicator
- Ground
- Low
- High
Standard value
Cushion : 1.39Ω +- 10% (leather/fabric)
Back : 1.41Ω +- 10% (leather/fabric)
Set : 2.8Ω +- 10% (leather/fabric)
2. Operate seat warmer after connecting the 4P connector, and then check the thermostat by measuring the temperature of seat surface.
Standard value
Cushion : 104 +- 3.6 ºF (40 +- 2 ºС) (LOW), 107.6 +- 3.6 ºF (42 +- 2 ºС) (HIGH)
Back : 114.8 +- 3.6 ºF (46 +- 2 ºС) (LOW), 125.6 +- 3.6 ºF (52 +- 2 ºС) (HIGH)
Rear Seat
1. Check for continuity and measure the resistance between terminal 2 and 3.
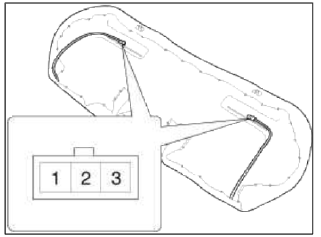
- Indicator
- Ground
- Heater
Standard value
Cushion : 5.29Ω +- 10% (leather/fabric)
2. Operate seat warmer after connecting the 4P connector, and then check the thermostat by measuring the temperature of seat surface.
Standard value
Cushion : 104 +- 3.6 ºF (40 +- 2 ºС)
READ NEXT:
 Climate Seat
Components and Components Location
Components
[Front Seat]
Ventilation blower
Ventilation ECU
Ventilation seat switch
Blower connector
Heater connector
Ventilation ECU
connec
Components and Components Location | Relay Box (Engine Compartment)
Component Location
[Engine Room Relay Box]
Main relay
Cooling fan relay (High)
Windshield deicer relay
Wiper relay (High)
Wiper relay (Low)
ATM relay
Rear
SEE MORE:
Exterior overview/ Interior overview
Exterior overview
Front view
Hood
Head lamp
Wheel and tire
Outside rear view mirror
Panoramic sunroof
Front windshield wiper blades
Windows
Front ultrasonic sensor
Front radar
Front view camera
Front fog lamp
Roof rack
SVM-front view camera
Rear
Cruise Control Switch
Schematic Diagrams
Circuit Diagram
[Auto Cruise Control]
Connector RH
ILL (-)
ILL (+)
-
-
-
ACC GND
ACC signal
ACC power
Repair procedures
Removal and Installation
1. Disconnect the battery (-) terminal.
Tightening torque:
Without battery sensor:
7.8 ~ 9.8N.m (
Content
- Home
- Kia Sportage - Fifth generation (NQ5) - (2022-2025) - Owner's Manual
- Kia Sportage - Second generation (JEKM) (2005-2015) - Body Workshop Manual
- Kia Sportage Third generation (SL) - (2011-2016) - Service and Repair Manual
- Sitemap
- Top articles
