Kia Sportage: Trailing Arm | Rear Cross Member
Repair procedures
Replacement
1. Remove the rear wheel & tire.
Tightening torque: 88.3 ~ 107.9N.m (9.0 ~ 11.0kgf.m, 65.1 ~ 79.6lb-ft)

CAUTION
Be careful not to damage to the hub bolts when removing the front wheel & tire (A).
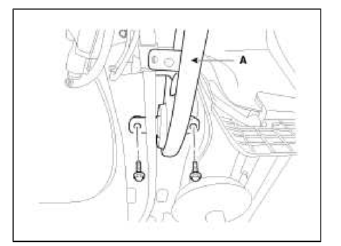
2. Loosen the nuts & bolts and then remove the trailing arm (A) from the rear axle.
Tightening torque 34.3 ~ 53.9N.m (3.5 ~ 5.5kgf.m, 25.3 ~ 39.8lb-ft)
[2WD]
![[4WD]](images/books/1921/25/index%2056.png)
[4WD]

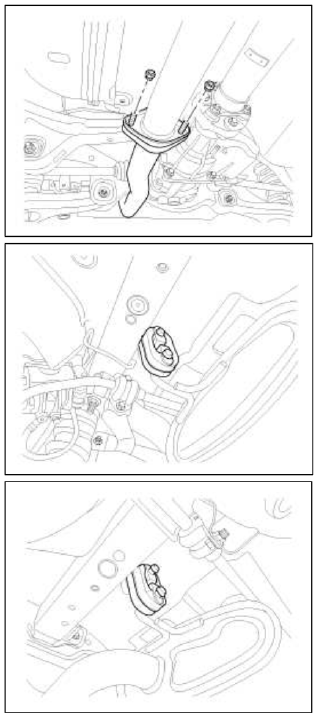
3. Loosen the parking brake cable bracket bolt (A) & height sensor bracket bolt (B).
[2WD]
![[4WD]](images/books/1921/25/index%2058.png)
[4WD]

4. Loosen the mounting bolt and then remove the trailing arm (A) with the frame.
Tightening torque: 98.1 ~ 117.7N.m (10.0 ~ 12.0kgf.m, 72.3 ~ 86.8lb-ft)
5. Installation is the reverse of removal.
Rear Cross Member
Repair procedures
Replacement
1. Remove the rear wheel & tire.
Tightening torque: 88.3 ~ 107.9N.m (9.0 ~ 11.0kgf.m, 65.1 ~ 79.6lb-ft)

CAUTION
Be careful not to damage to the hub bolts when removing the front wheel & tire (A).
2. Remove the parking brake cable.
(Refer to "Parking Brake System" in BR group)
3. Loosen the bolt and then remove the trailing arm (A).
Tightening torque: 98.1 ~ 117.7N.m (10.0 ~ 12.0kgf.m 72.3 ~ 86.8lb-ft)

4. Loosen the shock absorber mounting bolts (A).
Tightening torque: 49.0 ~ 63.7N.m (5.0 ~ 6.5kgf.m, 36.2 ~ 47.0lb-ft)

5. Remove the rear muffler.
6. Loosen the bolt and then remove the propellar shaft (A).

7. Loosen the mounting bolts and then remove the rear cross member (A) with the frame.
Tightening torque: 156.9 ~ 176.5N.m (16.0 ~ 18.0kgf.m, 115.7 ~ 130.2lb-ft)

8. Remove the rear lower arm.
(Refer to lower arm)
9. Remove the rear shock absorber.
(Refer to rear shock absorber)
10. Remove the rear upper arm.
(Refer to rear upper arm)
11. Remove the trailing arm.
(Refer to trailing arm)
12. Remove the rear assist arm.
(Refer to rear assist arm)
13. Remove the drive shaft.
(Refer to "Rear Drive Shaft" in DS group)
14. Remove the differential carrier.
(Refer to "Differential Carrier" in DS group)
15. Installation is the reverse of removal.
READ NEXT:
 Tire | Wheel
Repair procedures
Tire wear
1. Measure the tread depth of the tires.
Tread depth [limit]: 1.6 mm (0.063 in.)
2. If the remaining tread (A) depth is less than the limit, replace the tire.
NOTE
Wh
SEE MORE:
Roof panel (Without sunroof)
Roof front rail assembly
Roof rear rail assembly
Roof panel
Roof center No.1 rail
Roof center No.2 rail
Roof center No.3 rail
Roof panel (With sunroof)
Roof front rail assembly
Roof rear rail assembly
Roof panel
Sunroof reinforcement
Roof center No.3 rail
Side body panel
Front inner pillar assembly
Quarter inner panel assembly
Side outer rear extension assembly
Quarter outer panel assembly
Center outer pillar assembly
Pillar outer panel assembly
Side assembly outer panel
Center floor panel
Front seat cross rear member assembly
Center floo
Content
- Home
- Kia Sportage - Fifth generation (NQ5) - (2022-2025) - Owner's Manual
- Kia Sportage - Second generation (JEKM) (2005-2015) - Body Workshop Manual
- Kia Sportage Third generation (SL) - (2011-2016) - Service and Repair Manual
- Sitemap
- Top articles
