Kia Sportage: Components and Components Location | Front Seat Belt
Components

- Front seat belt
- Height adjuster
- Rear seat belt
- Rear seat belt [Center]
- Rear seat belt buckle
Front Seat Belt
Repair procedures
Replacement
Front Seat Belt Replacement
CAUTION
- When installing the belt, make sure not to damaged the pretensioner.
1. Remove the following items first:
- Front seat assembly (Refer to the BD group - "Front Seat")
- Front door scuff trim & Rear door scuff trim (Refer to the BD group - "Interior Trim")
2. To remove the seat belt anchor pretensioner (C), keep on pushing the lock pins (A) as arrow direction.
And then remove the seat belt after pushing the lock pin (B).

3. Remove the center pillar lower trim (A).
4. After loosening the mounting bolt, then remove the center pillar upper trim (A).

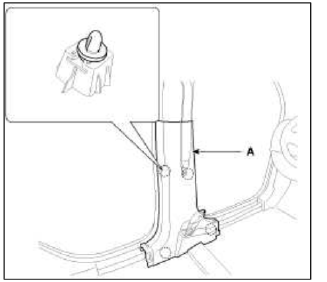
5. After loosening the mounting bolt, then remove the front seat belt upper anchor (A).
Tightening torque: 39.2 ~ 53.9 N.m (4.0 ~ 5.5 kgf.m, 28.9 ~ 39.8 lb-ft)

6. After disconnecting the pretensioner connector lock pin, remove the SIS connector (A), loosen the mounting bolt, then remove the pretensioner (B).
Tightening torque: 39.2~53.9 N.m (4.0~5.5 kgf.m, 28.9~39.8 lb-ft)

7. Installation is the reverse of removal.
Height Adjust Replacement
1. Remove the following items first:
- Front seat assembly (Refer to the BD group - "Front Seat").
- Front door scuff trim & Rear door scuff trim (Refer to the BD group - "Interior Trim")
- Front seat belt lower anchor
- Center pillar lower trim (Refer to the BD group - "Interior Trim")
- Center pillar upper trim (Refer to the BD group - "Interior Trim")
- Front seat belt upper anchor
2. After loosening the bolts, then remove the height adjustor (A).
Tightening torque: 39.2 ~ 53.9 N.m (4.0 ~ 5.5 kgf.m, 28.9 ~ 39.8 lb-ft)

3. Installation is the reverse of removal.
NOTE
- Replace ant damaged clips.
- Make sure the height adjust properly.
Front Seat Belt Buckle Replacement
1. Remove the following items first:
- Front seat assembly (Refer to the BD group - "Front Seat")
2. After loosening the mounting bolt, then remove the front seat belt buckle (A).
Tightening torque: 39.2 ~ 53.9 N.m (4.0 ~ 5.5 kgf.m, 28.9 ~ 39.8 lb-ft)

3. Installation is the reverse of removal.
READ NEXT:
 Rear Seat Belt
Repair procedures
Replacement
Rear Seat Belt Replacement
CAUTION
When installing the belt, make sure not to damaged the retractor.
1. Remove the following items first.
Rear seat as
SEE MORE:
Vehicle settings (infotainment system) (if equipped)
Press the Settings button on the head
unit of the infotainment system.
Select Vehicle and change the setting
of the features.
Vehicle Settings in the infotainment system
provides user options for a variety
of settings including door lock/unlock
features, convenience features, driv
Rear Washer Switch | Rear Washer Motor
Repair procedures
Inspection
Check for continuity between the terminals while operating the wiper and washer switch. If it is not normal condition, replace wiper and washer switch.
Rear Wiper Switch
Rear Washer Switch
Rear Washer Motor
Repair procedures
Inspection
1. With
Content
- Home
- Kia Sportage - Fifth generation (NQ5) - (2022-2025) - Owner's Manual
- Kia Sportage - Second generation (JEKM) (2005-2015) - Body Workshop Manual
- Kia Sportage Third generation (SL) - (2011-2016) - Service and Repair Manual
- Sitemap
- Top articles
