Kia Sportage: Transfer Assembly
Front Wheel Transfer Assembly
Components and Components Location
Components Location
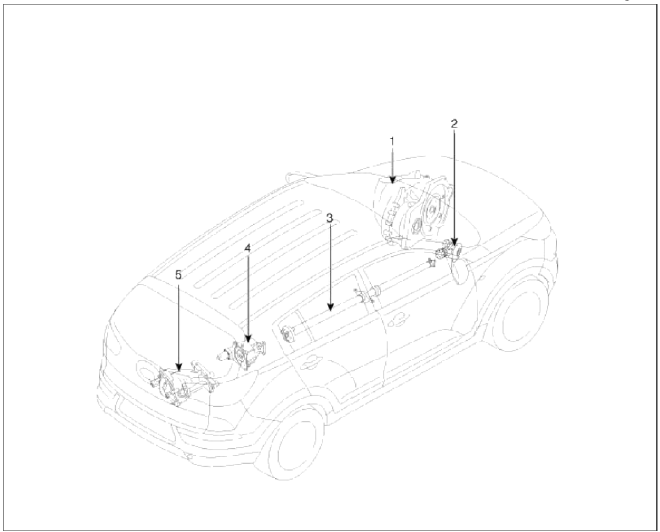
- Automatic transaxle
- Transfer assembly
- Propeller shaft
- Coupling assembly
- Differential assembly
Repair procedures
Inspection
Transfer Oil Inspection
Transfer oil should be inspected and refilled every 30 months or 37,500 miles.
Transfer Oil Replacement
1. Transfer oil is not replaced in normal condition. But it should be replaced every 75.000 miles in severe driving conditions.
NOTE
Severe driving conditions
- Driving in dusty, rough roads
- Driving in mountains areas
- Driving for patrol car, taxi, commercial car or vehicle towing
- Driving over 170Km/h
CAUTION
Transfer oil should be replaced if the transfer assembly is fall into the water.

Tightening torque
Oil drain plug (A): 39.2 ~ 58.8N.m (4.0~6.0kgf.m, 28.9~43.4lb-ft)
Filler plug (B): 39.2 ~ 58.8N.m (4.0~6.0kgf.m, 28.9~43.4lb-ft
Removal
1. Lift up the vehicle.
2. Remove the propeller shaft bolts. (A-4ea)
Tightening torque: 49.0~68.6N.m (5.0~7.0kgf.m, 36.2~50.6lb-ft)

3. Remove the right driveshaft (passenger side) from the transfer case. (Refer to "Drive shaft" in DS group).
4. Remove the roll rod bracket (C) after removing bolt (A, B).
Tightening torque:
(B) 49.0~63.7N.m (5.0~6.5kgf.m, 36.2~47.0lb-ft)
(D) 107.9~127.5N.m (11~13kgf.m, 79.6~94.1lb-ft)

5. Remove the sub frame. ("Front suspension system" in SS group)
6. Remove the transfer case up and down mounting bolt (A-4ea, B-1ea).
Tightening torque: (A, B) 60.8~65.7N.m (6.2~6.7kgf.m, 44.8~48.5lb-ft)

7. Remove the transfer case (C) with the lever after supporting the transfer case with a jack.
Installation
1. Installation is the reverse of removal.
NOTE
1. Be careful not to damage the О-ring (A). If the О-ring is damaged, replace with a new one.
2. Smear and cover splines (B) with molybdenum type high pressure grease.
TECHLUBE MEGAMAX - ALPHA OR EQUIVALENT

3. Install the propeller shaft near runout marking (Transfer assembly 1ea (A). propeller shaft 1ea (B) ).

READ NEXT:
 Description and Operation, Flow Diagram | Schematic Diagrams | Components and Components Location, Repair procedures
Description and Operation
Description
4WD ECU processes signals from various sensors and determines the current road and driving conditions. The ECU then utilizes this information to impleme
SEE MORE:
Washer fluid
Checking the washer fluid level
The reservoir is translucent so that you
can check the level with a quick visual
inspection.
Check the fluid level in the washer
fluid reservoir and add fluid if necessary.
Plain water may be used if
washer fluid is not available.
However, use was
Climate Seat
Components and Components Location
Components
[Front Seat]
Ventilation blower
Ventilation ECU
Ventilation seat switch
Blower connector
Heater connector
Ventilation ECU
connector
Schematic Diagrams
Schematic Diagram
[Front Seat]
Connector Configurations
Bl
Content
- Home
- Kia Sportage - Fifth generation (NQ5) - (2022-2026) - Owner's Manual
- Kia Sportage - Second generation (JEKM) (2005-2015) - Body Workshop Manual
- Kia Sportage Third generation (SL) - (2011-2016) - Service and Repair Manual
- Sitemap
- Top articles
