Kia Sportage: Tail Gate
Repair procedures
Replacement
Tail Gate Trim Replacement
CAUTION
- When prying with a flat-tip screwdriver, wrap it with protective tape, and apply protective tape around the related parts, to prevent damage.
- Put on gloves to protect your hands.
1. Remove the upper trim (C).
2. After loosening the mounting screws, then remove the side trim (B) and tail gate trim (A).
NOTE
- Replace any damaged clips.
3. Installation is the reverse of removal.

Tail Gate Latch Replacement
1. Remove the tail gate trim.
2. After loosening the mounting bolts, then remove the latch assembly (A).
Tightening torque: 6.9 ~ 10.8 N.m (0.7 ~ 1.1 kgf.m, 5.1 ~ 8.0 lb-ft)

3. Disconnect the tail gate latch connector (A).

4. Installation is the reverse of removal.
NOTE
- Make sine the connector is connected properly and the connecting rod is connected properly.
- Make sure the tail gate opens properly and locks securely.
Tail Gate Lift Replacement
NOTE
- Take care not to be closed the tail gate, when removing the lift.
1. Using a screwdriver (A), lift up slightly the socket clips (B) of both ends on the lifer (D). and then remove the lifter from the bracket (C).
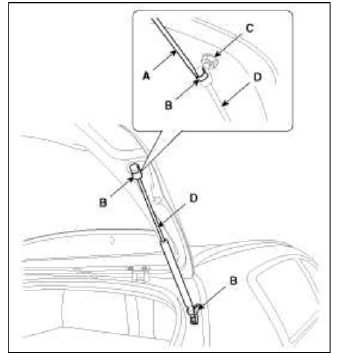
2. Push the socket of the lifter into the bracket for installation.
NOTE
- Make sure the tail gate lock and opens properly and locks securely.
Tail Gate weatherstrip Replacement
CAUTION
- Do not apply sealant to the body.
1. Remove the tail gate weatherstrip (A).

2. Installation is the reverse of removal.
NOTE
- Install the weatherstrip aligned with center line (B).
Adjustment
1. After loosening the tail gate hinge (A) mounting bolt, adjust the tail gate by moving it up or down, or right or left.
2. Adjust the tail gate height by turning the tail gate overslam bumpers (B).
3. After loosening the tail gate striker (C) mounting bolts, adjust the tail gate striker by moving it up or down, or right left.

READ NEXT:
 Front Door
Components and Components Location
Components
Front door trim
Front door inside handle cap
Front door trim seal
Front door quadrant inner cover
Front door module
Front door pane
Rear Door
Components and Components Location
Components
Rear door trim
Rear door inside handle cap
Rear door belt inside weatherstrip
Rear door trim seal
Rear door module
Rear door panel
Body Side Moldings
Repair procedures
Replacement
Roof Rack Replacement
CAUTION
When prying with a flat-tip screwdriver, wrap it with protective
tape, and apply protective tape around the
related parts,
SEE MORE:
Description and Operation
OBD-II review
1. Overview
The California Air Resources Board (CARB) began regulation of On Board
Diagnostics (OBD) for vehicles sold in
California beginning with the 1988 model year. The first phase, OBD-L required
monitoring of the fuel metering
system, Exhaust Gas Recirculation (EGR)
Vehicle weight
This section will guide you in the proper
loading of your vehicle, to keep your
loaded vehicle weight within its design
rating capability. Properly loading your
vehicle will provide maximum return of
the vehicle design performance. Before
loading your vehicle, familiarize yourself
with the fo
Content
- Home
- Kia Sportage - Fifth generation (NQ5) - (2022-2025) - Owner's Manual
- Kia Sportage - Second generation (JEKM) (2005-2015) - Body Workshop Manual
- Kia Sportage Third generation (SL) - (2011-2016) - Service and Repair Manual
- Sitemap
- Top articles
