Kia Sportage: Roof Trim
Components and Components Location
Components
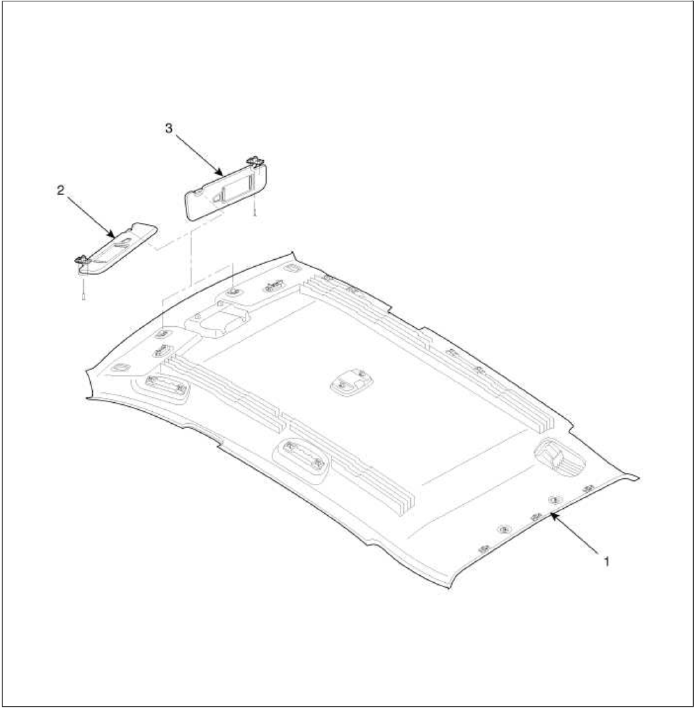
- Roof trim
- Sunvisor [Driver's]
- Sunvisor [Passenger's]
Components [Panoramaroof]
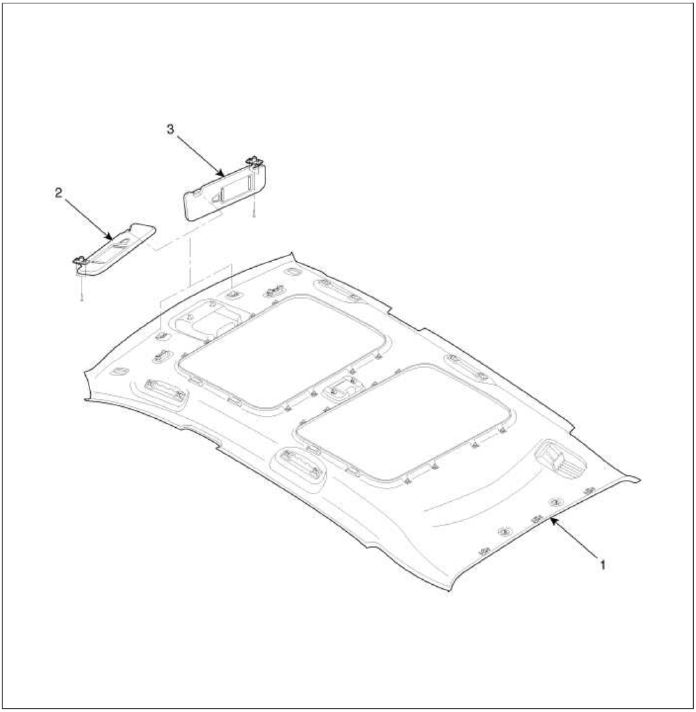
- Roof trim
- Sunvisor [Driver's]
- Sunvisor [Passenger's]
Repair procedures
Replacement
Sunvisor Replacement
CAUTION
- Use a plastic panel removal tool to remove interior trip pieces to without marring the surface.
- Put on gloves to protect your hands.
1. After loosening the mounting screws, then remove the sunvisor (A) and retainer (B).

2. Installation is the reverse of removal.
Assist Handle Replacement
CAUTION
- Use a plastic panel removal tool to remove interior trip pieces to without marring the surface.
- Put on gloves to protect your hands.
1. Remove the covers (A).
2. After loosening the mounting screws, then remove the assist handle (B).

3. Installation is the reverse of removal.
Overhead Console Replacement
CAUTION
- Use a plastic panel removal tool to remove interior trip pieces to without marring the surface.
- Put on gloves to protect your hands.
1. After loosening the mounting screws, then remove the overhead console assembly (A).

2. Disconnect the connectors (A).

3. Installation is the reverse of removal.
NOTE
- Make sure the connector is connected properly.
Room Lamp Replacement
CAUTION
- Use a plastic panel removal tool to remove interior trip pieces to without marring the surface.
- Put on gloves to protect yоur hands.
1. Using a screwdriver or remover, remove the room lamp cover (B).
2. After loosening the mounting screws, then remove the room lamp (A).

3. Disconnect the connector (A).

4. Installation is the reverse of removal.
NOTE
- Make sure the connectors are plugged in properly.
Vanity Lamp Replacement
CAUTION
- Use a plastic panel removal tool to remove interior trip pieces to without mailing the surface.
- Put on gloves to protect уоur hands.
1. Using a screwdriver or remover, remove the vanity lamp (A).
2. Disconnect the connector (B).

3. Installation is the reverse of removal.
NOTE
- Make sure the connector is connected properly.
Roof Trim Replacement
CAUTION
- When prying with a flat-tip screwdriver, wrap it with protective tape, and apply protective tape around the related parts, to prevent damage.
- Put on gloves to protect уоur hands.
1. Remove the following items.
- Front seat (Refer to the BD group - "Front Seat")
- Rear seat (Refer to the BD group - "Rear Seat")
- Sunvisor
- Overhead console
- Room lamp
- Assist handle
- Front pillar trim (Refer to the BD group - "Interior Trim")
- Front door scuff trim & Rear door scuff trim (Refer to the BD group - "Interior Trim")
- Center pillar lower trim & Center pillar upper trim (Refer to the BD group - "Interior Trim")
- Rear pillar trim (Refer to the BD group - "Interior Trim")
2. Remove the ECM mirror cover (A).
3. Disconnect the ECM mirror connector (B).

4. Remove the rain sensor cover (A).
5. Disconnect the rain sensor connector (B).

6. Disconnect the roof trim main connector (A).
[Driver's]
![[Passenger's]](images/books/1921/5/index%20239.png)
[Passenger's]

7. Disconnect the antenna connector (A).

8. Remove the clips and roof trim (A).

9. Installation is the reverse of removal.
NOTE
- Make sure the connectors are plugged in properly.
- Replace any damage clips.
READ NEXT:
 Interior Trim
Components and Components Location
Components
Front pillar trim
Center pillar upper trim
Center pillar lower trim
Luggage side trim
Cowl side trim
Front door scuff trim
Rear d
Windshield Glass
Components and Components Location
Components
Windshield side
molding
Windshield glass
Repair procedures
Replacement
Removal
CAUTION
Put on gloves to protect your hand
SEE MORE:
Curtain air bag
Curtain air bags are located along both
sides of the roof rails above the front
and rear doors.
* The actual air bags in the vehicle may
differ from the illustration.
They are designed to help protect occupants
in certain side impacts and to help
prevent them from ejecting out of the
veh
Forward Collision-Avoidance Assist (FCA) (Front Camera Only)
Forward Collision-Avoidance Assist is
designed to help detect and monitor the
vehicle ahead or help detect a pedestrian
or cyclist in the roadway and warn
the driver that a collision is imminent
with a warning message and an audible
warning, apply emergency braking.
Detecting sensor
Content
- Home
- Kia Sportage - Fifth generation (NQ5) - (2022-2025) - Owner's Manual
- Kia Sportage - Second generation (JEKM) (2005-2015) - Body Workshop Manual
- Kia Sportage Third generation (SL) - (2011-2016) - Service and Repair Manual
- Sitemap
- Top articles
