Kia Sportage: Muffler
Components and Components Location
Components
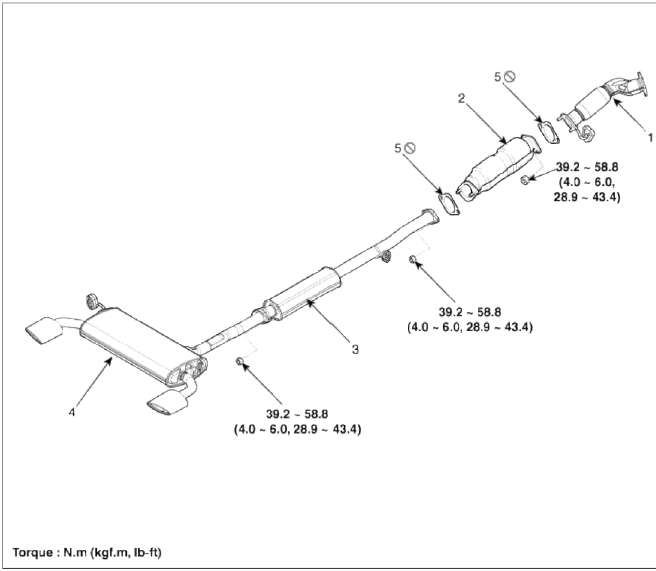
- Front muffler
- Catalytic converter
- Center muffler
- Main muffler
- Gasket
Repair procedures
Removal and Installation
1. Remove the front muffler (A).
Tightening torque: 39.2 ~ 58.8 N.m (4.0 ~ 6.0 kgf.m, 28.9 ~ 43.4 lb-ft)

2. Remove the catalytic converter (B) after removing the rear oxygen sensor (A).
Tightening torque:
Oxygen sensor (A): 44.1 ~ 49.0 N.m (4.5 ~ 5.0 kgf.m, 32.5 ~ 36.2 lb-ft)
Nuts (B): 39.2 ~ 58.8 N.m (4.0 ~ 6.0 kgf.m, 28.9 ~ 43.4 lb-ft)

3. Remove the center muffler (A).
Tightening torque: 39.2 ~ 58.8 N.m (4.0 ~ 6.0 kgf.m, 28.9 ~ 43.4 lb-ft)

4. Remove the main muffler (A).

5. Installation is the reverse order of removal.
NOTE
When installing, replace with new gaskets.
READ NEXT:
 Specifications, Special Service Tools
Specifications
Specifications
Fuel Delivery System
Sensors
Manifold Absolute Pressure Sensor (MAPS) #1
Type: Piezo-resistive pressure sensor type
Specification
Intake Ai
SEE MORE:
Rear View Monitor settings
Rear View Monitor (RVM) (if equipped)
Rear View Monitor will show the area
behind the vehicle to assist you when
parking or reversing.
Detecting sensor
Rear view camera
Refer to the picture above for the
detailed location of the detecting sensor.
Rear View Monitor settings
Camera se
Safety chains
You should always attach chains
between your vehicle and your trailer.
Cross the safety chains under the
tongue of the trailer so that the tongue
will not drop to the road if it becomes
separated from the hitch.
Instructions about safety chains may be
provided by the hitch manufacturer or
Content
- Home
- Kia Sportage - Fifth generation (NQ5) - (2022-2025) - Owner's Manual
- Kia Sportage - Second generation (JEKM) (2005-2015) - Body Workshop Manual
- Kia Sportage Third generation (SL) - (2011-2016) - Service and Repair Manual
- Sitemap
- Top articles
