Kia Sportage: Components and Components Location | Rear Wiper Motor
Component Location
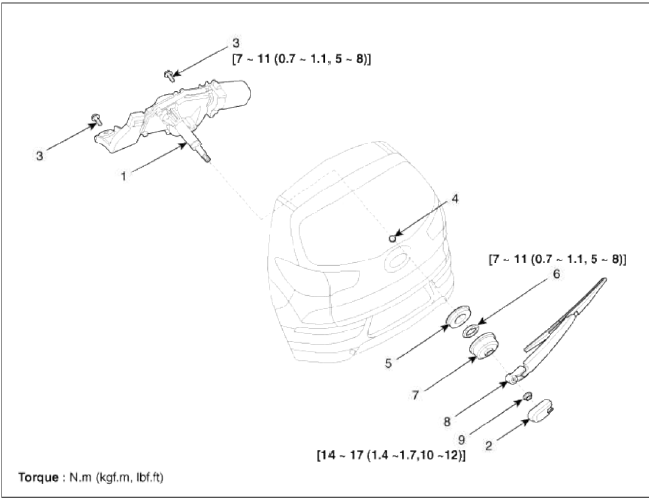
- Rear wiper motor assembly
- Head cap
- Rear wiper motor mounting bolt
- Rear wiper motor mounting hole
- Pad cap
- Hexagonal nut
- Cover
- Rear wiper arm & blade
- Rear wiper arm nut
Rear Wiper Motor
Repair procedures
Inspection
Rear Wiper Motor
1. Remove the 4P connector from the rear wiper motor.
2. Connect battery positive (+) and negative (-) cables to terminals 2 and 1 respectively.
3. Check that the motor operates normally. Replace the motor if it operates abnormally.
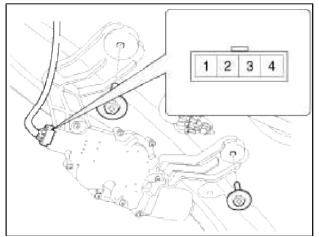
- GND
- Switch
- Parking
- IGN(+)
Automatic Stop Operation Check
1. Operate the motor at low speed using the stalk control.
2. Stop the motor operation anywhere except at the off position by disconnecting terminal 2.
3. Connect terminals 2 and 3.
4. Connect the positive (+) lead from the battery to terminal 4 and the negative (-) lead to terminal 1.
5. Check that the motor stops running at the off position.

Removal
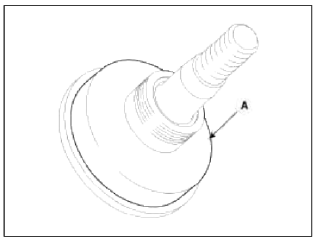
1. Detach the rear wiper head cap (A).

2. Remove the rear wiper arm & blade (A) after removing rear wiper arm nut (B).

3. Remove the rear wiper cover (A) and HEX nut (B).

4. Remove the pad cap (A).
5. Open the tailgate then remove the tailgate trim.
(Refer to the BD group - "Tailgate")
6. Disconnect the rear wiper motor connector (A) then remove the rear wiper motor (B) after loosening bolts (2EA).

Installation
1. Install the rear wiper motor assembly
Tightening torque Nut: 7 ~ 11 N.m (0.7 ~ 1.1 kgf.m 5 ~ 8 lbf.ft)
NOTE
Do not reuse the rubber pad if it is damaged.
2. Install the tailgate trim.
(Refer to the BD group - "Tailgate")
3. Insert the pad cap and HEX nut.
Tightening torque: 7 ~ 11 N.m (0.7 ~ 1.1 kgf.m 5 ~ 8 lbf.ft)
4. Install the rear wiper arm and blade to align with black lowest rear defogger line (A).

5. Install the rear wiper arm and rear wiper nut.
Tightening torque Nut: 14 ~ 17 N.m (1.4 ~ 1.7 kgf.m 10 ~ 12 lbf.ft)
READ NEXT:
 Rear Washer Switch | Rear Washer Motor
Repair procedures
Inspection
Check for continuity between the terminals while operating the wiper and washer switch. If it is not normal condition, replace wiper and washer switch.
Rear Wi
SEE MORE:
General Safety Information and
Caution
Instructions
When Handling Refrigerant
1. R-134a liquid refrigerant is highly volatile. A drop on the skin of your
hand could result in localized frostbite.
When handling the refrigerant, be sure to wear gloves.
2. It is standard practice to wear goggles or glasses to protect your ey
Air bag collision sensors
* The actual shape and position of sensors may differ from the illustration.
Supplemental Restraint System (SRS) control module/rollover sensor
Front impact sensors
Side pressure sensors (front door)
Side impact sensors (B-pillar)
Side impact sensors (C-pillar)
WARNING
Air bag se
Content
- Home
- Kia Sportage - Fifth generation (NQ5) - (2022-2025) - Owner's Manual
- Kia Sportage - Second generation (JEKM) (2005-2015) - Body Workshop Manual
- Kia Sportage Third generation (SL) - (2011-2016) - Service and Repair Manual
- Sitemap
- Top articles
